Showing posts with label Virtualbox. Show all posts

Thursday, May 21, 2015

Re-sizing a Virtualbox Debian Guest Window


4 Oct 2015
v 0.21
Ok .. it has been nearly a year .. I guess that means I have a whole swag of material to write about.


It has been driving me nuts.

No matter what I've done, I have not been able to dynamically re-size Debian Jessie in a virtualbox window.  Until yesterday.  Now, whilst I'm describing how to do this in Debian Jessie, the broad principles apply to other guests, such as PC-BSD.

So, here we go.

  • When you install Jessie, select all the video memory you can - a 128mb video card and make sure you have NO 3d acceleration.
  • Once you have done the installation, add contrib to the sources.list file in /etc/apt.


Now, you need to install packages to build your guest additions.  Note here I'm not using the guest additions from the virtualbox site, but those in the Debian repositories.  For most people, the synaptic package manager will be the easiest.

Packages to install:
  • Build essential
  • linux headers for your architecture (headers will probably be pulled in with Build essential and module assistant)
  • module assistant
  • virtualbox guest dkms
  • virtualbox guest X11
  • virtualbox guest source
  • virtualbox guest utils
The key thing here is that you want the X11 module - that is what I was missing before.  You need the guest system to use the Virtualbox graphics drivers.

Now from the command line:
  • m-a prepare
  • m-a
  • Install virtualbox guest from menu
The m-a command will bring up a menu that when you scroll down, you can select the virtualbox modules to install.

reboot

You can now resize window etc.


Violas .. we have a string section.


Later .....

Saturday, June 8, 2013

Debian Wheezy - Virtualbox Shared Folders

v 0.2
8th Jun 2013

One thing I've never found very satisfactory is the method of organising shared folders between a Linux guest and the Host systems in Virtualbox.  The instructions I've read have never seen to be satisfactory.  Until now.  In this example, I'll use a Windows host and a Debian Wheezy guest system, however it works exactly the same on my Macbook for OSX.

  • First, add a shared folder to the Virtualbox manager for the VM.  I added "C:/Users/geoff/share" .  Make sure "automount" and "make permanent" are ticked and "read only" NOT ticked for bi-directional sharing.
  • Within the Wheezy guest, install the package " gnome-system-tools ".  This gives you additional administration tools, such as group management.
  • Open "Applications | System tools | Administration | Users and Groups"
  • Manage Groups
  • Scroll down till you find the group " vboxsf "
  • Highlight it and click "Properties"
  • You will see a list of usernames in the box "Group Members" - tick the users you wish to be able to use the shared folder.  Authenticate the action with the root password.
  • Close the programs and Reboot.
  • Log in, and open Nautilus - navigate to the " /Media " directory.  You will see a directory named (in my case)  " sf_share ".  (the directory is always named " sf_ ...... " ) .  Any file you now place in that directory in Host, will be shown when you open the directory in Guest.

Done!!


Later.

Wednesday, February 6, 2013

PC-BSD 9.1 Linux Jails, VirtualBox, Citadel Groupware

v 0.2
6 Feb 13

The last few days, I've been playing with PC-BSD Jails via Warden.  I've found that the BSD Jails work just great, as I've mentioned previously, however I've been having problems installing servers on a Debian Linux Jail.  Some servers install without a hitch, and others just won't let the outside world see them. 

A case in point is installing Citadel Groupware.  In the Linux Jail, the two components can't talk to each other - Webcit, which provides the outward facing web interface, can't see the Citserver to talk on TCP 504.  Installing on Virtualbox, no problems - it installs without a hitch.

Another example is the installation of Web Servers.  Apache - nope.  Nginx - worked out of the box.  In all cases, the installation was using the standard Debian packages from the Main repository.

Debian Jail - Install Script

The way Debian is installed in a Linux Jail, is using the debootstrap command.  The way this is set in the install script is simply:

debootstrap squeeze

However, there are several architectures for Debian, in particular, the ones we want use the FreeBSD kernel .. should we include the architecture we want?  So, it would look like:

debootstrap --arch kfreebsd-i386 squeeze
or
debootstrap --arch kfreebsd-amd64 squeeze

I haven't really seen any difference, however I wonder ...

Citadel Again

Maybe I take a little longer for the concepts to sink in, but I've finally satisfied myself that the Debian packages do the same installation (albeit with files in different places - because it is Debian).
  • The servers are installed
  • The "citadel" user is created to run the server
  • The init scripts are sorted.
The outcome of all this is that when the machine (virtual or real) is started, Citadel starts as well.

How to re-configure the Citadel Server?  There is a setup script in
"/usr/lib/citadel-server"
Run that script if you need to and you can adjust ports, and add an admin user.

Be aware, that Webcit ignores your setup instructions.  Get a text editor and edit
"/etc/default/webcit"
to your liking.


Later .........


Tuesday, May 29, 2012

The Law and TLD, The Cloud and Home Servers

v 0.22
12 Jun 12

I've recently had a few disparate threads of the Cosmos come together to lead me down a new line of interest with my Computing.  It all started a few months ago when I was reading my daily dose of "Slashdot" and has finished with me starting to set up a Home Server for myself.

The Law

Whilst the Slashdot article was about the US Government seeking the extradition of a UK Student, the issue was their assertion that all ".com , .net , .org " etc domain names were subject to US Law, no matter where the servers or businesses or organisations were located.  Now, whilst the current actions involve copyright infringement allegations, I can see that this could easily be extended to other areas of the law,  were it convenient for those in power.  A link to a relevent article:

http://www.theinquirer.net/inquirer/news/2083906/claims-com-net-websites-jurisdiction

Whether the legalities of this assertion by the US Government are shown to be valid or not, what it means (to me, anyway) is that if you host a website with one of these top level domains, then you potentially must comply with US Law.  You may, for example, run a business in one particular country using such a website, so not only do you need to comply with your own country's laws, you must also comply with those of the US.  Some (legitimate) Canadian businesses are already discovering this.

The lesson I've taken away from this is that if I need a business or other serious website, then a domain name from maybe my own country would be a better decision.

The Cloud

The Cloud is certainly a convenient place to store data, and in all normal circumstances, your data should be quite safe - Google has just received security certification for its services.  Dropbox, whilst convenient, doesn't store your data encrypted, whilst SpiderOak does.  If you are paranoid and want to use Cloud storage, then SpiderOak would be great.  Or encrypt your data on ANY Cloud device.

Of course the problem comes when your provider has their server seized by whichever Law Enforcement agency, because of some other entity which also uses that server ........

Home Servers

It almost feels to me that the concept of keeping your own data is making a comeback - perhaps not for all, but "the Cloud" is not necessarily the best move in all circumstances.  There are some really interesting Web applications that can be hosted on your own server.  Several I'm fascinated with are "OwnCloud", "OnEye", "Diaspora" and "Citadel".  I easily set up "OnEye" on a test virtual server at home, and did the same with "Citadel".

Routers

When I tried to demonstrate Citadel to an organisation I was a member of though, I found I couldn't get my router (Apple Time Capsule) to open any ports to allow this.  Googling for a solution gained me nothing other than finding more than a few others with the same problem and the best I could find was that it was a flaw in the firmware.

Bad Time Capsule .... Bad Bad Time Capsule.

So out of that, I thought maybe time for a "proper" router.  I'd recently seen an interesting "Category5TV" Episode 166 dealing with DD-WRT firmware and a Netgear router.  In the end, I chose to get a WNDR 3700 Netgear - for it's firmware flashing capabilities and the wireless range it offered.

* Subsequently I found that my ISP was blocking some ports - it wasn't helped by them denying it when I called to see if this was in fact happening.  Unfortunately I had to fall back on detective work to discover this (and then have my Nephew say "yes, of course they do, didn't you know?").  So Ultimately, I could have saved my money and continued with the Time Capsule by using unblocked ports.  Sigh

Server Hardware

As I mentioned before, I'd been playing with servers within Virtualbox Virtual Machines on my Desktop - now whilst at the time I knew my desktop wasn't the best machine to use as a server if only for its power consumption, I was prepared to live with this for a short while, however once I started thinking about the router problem, my mind drifted back a week or so to when Dell sent me an advertisement for what I considered to be a cheap desktop that would be suitable.  Of course, I wouldn't be buying the Dell because I had plenty of screens and keyboards already and saw no point in buying anymore, not to mention that I had no use for Windows on my server.  But research into the components did lead me to an interesting setup.

Motherboard   Asus P8H61-M LX Rev 3
CPU                Intel i-3 2120
Memory          8 gig
HDD               Western Digital 2 TB Caviar Green
DVD drive

This machine is about 10 times as fast as a P4 3.0 box I already have and uses less power.  How much less?   Testing I've seen indicates the machine should use between 50 and 100 watts under most conditions.  Using this as a server rather than one of the previous two I've mentioned would be a minimum saving of 200 watts.  This works out at roughly 5kwhr per day or over $1 per day where I live.  It would pay for itself in electricity charges in a year.

Server Software

Having worked out the hardware, I'm planning on replacing an old P4 desktop that is used by the family.  I intend having it used as a desktop, with Virtualbox providing servers in virtual machines.

Debian "Wheezy"  64bit
Xfce Desktop
Virtualbox

At the moment, I intend setting up one or two virtual machines as Citadel servers - one for the family and one for my organisation to evaluate.  After that, well there are a number of interesting projects that are available, even within the Debian repositories.

I think that is enough for now ... I shall report back with my installation adventures.


Later ...........

Tuesday, May 22, 2012

Citadel Groupware - Some Possibilities

v 0.3
23 May 12

I was thinking this morning that Citadel provides the possibility of some really interesting implementations.  It is easy to install (especially in Debian), and they provide up-to-date debs from their own repository.  You can even have it running in a Virtualbox instance.

I strongly recommend you install Citadel via a Debian install and use the Citadel repository.  I was using the Wheezy version which had severe flaws in Wiki and File rooms - fixed when I updated to the latest version.

Don't like how it looks?  Easy .. just adjust the CSS and have it look any way you like.  They give you the page structure on the website and a CSS example to use and modify.

It is easy to set up a secure (you get https out of the box) network of Citadel servers (don't forget, this is not a client, it is a series of SERVERS that you can view as localhost on your web browser on the same computer if you like) and have your own secure independent email network - share projects, share files all over https.  Use a dynamic DNS provider and you can have a mobile node that can make connection from a hotel and the network sharing is up and running again.

These are just a few thoughts, however I'm sure there are more uses.

In case you are wondering what I'm saying about an independent email network...  Out of he box, Citadel will send email to users of the independent system based on their username.  Consequently, if you simply connect two Citadel servers together, then you can share email between the servers directly within that network.  Add connect via https and you are up and away .....

Finally, what servers are included in Citadel?  Here is what I've worked out so far:
  • Web server (webcit)  (http  https)
  • Mail Server (SMTP POP3 IMAP)
  • Calendar Server
  • Jabber (IM) Server (XMPP)

Later....

Sunday, May 20, 2012

Citadel Groupware

 v 0.22
24 May 12

Citadel is different - on first glance, it looks like a BBS with aspirations above its station.  I’ve had a love/hate relationship with this Groupware from the first time I saw it in the Debian repository and read about it.  

It has history … extensive history.  It grew out of the old BBS systems of Dial-up modem times, and still has a text mode that replicates that, although normal interaction is through a web browser and the “Webcit” server application.

Citadel looks, at first, a little dated and I’ve found user documentation a little sparse, however I’m slowly “getting” it and starting to really like it.  One thing I especially like is that it has several security advantages over other packages, notably immunity to PHP and SQL attacks.  It has its own inbuilt servers and it does not use PHP or MySQL.

So, how does Citadel qualify for the compliments I’ve seen about it?

Whilst it may seem a little “clunky” at first glance (it can be modified), its power lies in its simplicity of concept and gentle learning curve.  It is easy to set up, and you can start out with a very simple configuration and expand as you become familiar with how to use it.  It is like being given a pile of different lego blocks and discovering how to assemble them into ever more complex objects.

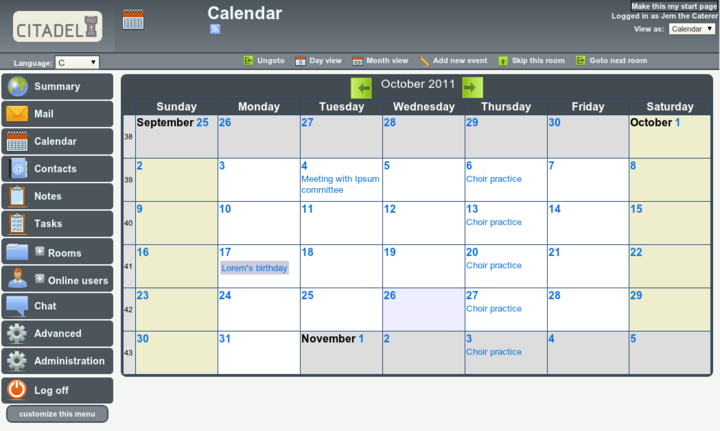
It is probably time for a screenshot (from the Citadel website), and then a discussion of how the setup works.  Once logged in to the application, this is how it generally looks, with a menu on the left and the subject of whatever you have selected in the main window.  Note:
  • login and viewing details in the top right
  • selection options for the current viewing window along the top menu-bar


Of the “Menu Selection Buttons” on the left, the private “rooms” for each user are:
  • Mail
  • Calendar
  • Contacts
  • Notes
  • Tasks
 

  • The “ +Rooms “ selection expands to the current “room” matrix.  These can be public or private, hidden or password protected, as determined when they are created.
  • “Advanced” is allocated on a per-user basis, depending on what permissions a user gets.
  • “Administration” is, obviously, allocated to an Administrator.
  • The menu is tailored to each user and setup.

At its core, Citadel is an old-style BBS.  Forums use the paradigm of “Floors and Rooms” of a building.  Each “Floor” has a broad subject, with each room being a more specific subject.  Where this differs from a standard BBS is that each room can take several forms.  The “room” could be a standard message topic discussion, or it could be a task list or a Blog.  So, in the case of a company project, there could be one floor named “Project” with separate rooms for message discussions, task lists, a blog talking of progress on issues and even perhaps a calendar.

Communication.  
  • Out of the box, Citadel offers email between registered users, with only the username required.  After it is configured, then conventional email is available.
  • There is an IM facility between logged in members.  There is more. Put a “Jabber” client such as Pidgin on your desktop and tell it about Citadel, and Citadel can act as a Jabber server connecting users.

Office Documents
  • Blog and Wikis.  Any room can be configured to act as it says.  I have to say though that I’ve yet to get the Wiki feature to work as I’d like (upgrade to 8.11 fixed that problem).
  • Calendars and Notes and Tasklists.  As it says, you can also nominate any room for these.  The “Notes” are sticky notes, and the Tasklists, while basic, can be categorised quite finely.

Networking
  • Citadel servers can be configured to network together simply by telling them about each other.  Users, rooms etc can be shared and a quite complex “social network” of sorts can be constructed.  These building blocks can link together to construct quite a complex system.  Impressive.

One final thing for the moment.  FLOSS Weekly Episode 209 is all about Citadel.  Worth the look.


Later...

Saturday, May 12, 2012

OnEye - Installing to Debian Wheezy on Virtualbox

v 0.35
13 May 12

Last post I said I had OnEye successfully installed.  Here is how I did it.

Initially when I thought of setting up a server, I thought of buying a low power piece of hardware and using that, but then realised I already had an under-utilised desktop that could easily run a server in the background using virtualisation - an opportunity to try out and learn a few skills in the process.

After updating Virtualbox to the latest version, I created a new virtual machine.  I've learnt a bit about setting the boot device since my last installation and so with the new virtual machine entry highlighted in the VirtualBox window, press the "Settings" button.  Press "Storage" and then click the CD icon under "IDE Controller", then on the right where it says cd/dvd drive, click the icon of the cd and from the dialog box, move to and select the iso image you want to boot from.  Now when you press "Start" it will boot from your downloaded ISO - in my case, the Debian Testing Netinstall ISO -

http://cdimage.debian.org/cdimage/daily-builds/daily/arch-latest/i386/iso-cd/debian-testing-i386-netinst.iso  .


Once I started the install, it came up with the standard debian install dialog - as contained in a number of Debian installation how-tos. The text installer is readable and when you think about the selections, they are logical.

  • English language
  • Where you are in the world (Australia for me)
  • American English keyboard

I chose the guided partitioning with separate partitions and accepted the defaults - I'd created an expandable 250 GB virtual machine so this is what the Debian Installer gave me:

/ 350mb
/usr  9 GB
/var  3 GB
/swap 2.1 GB
/tmp  398 mb
/home 233.5 GB

When Tasksel presented itself, I deselected the desktop and selected
  • Web server
  • SSH server 
  • Standard System Utilities

Later, just to be sure I also installed the apache2 package and restarted apache2.  I installed links2 and was able to confirm the webserver was functioning in both root and user accounts with

$ links2 http://localhost/index.html  and
$ links2 http://localipaddress/index.html

Unfortunately, I was unable to see the page on any other machine on the network.  A read of the Virtualbox documentation.  I was using NAT which was fine for general web browsing etc, however for using a server, I needed a Bridged adapter.  I shut down the server, changed the network adapter to "bridged" and restarted.  Fixed.

On an external computer, simply type the local ip address into the web-browser and it will be found - so that worked.

Next task was to assign a permanent ip address from my router.  Logged into it and assigned a local ip address based on the MAC address shown with "ifconfig" in the Virtual Machine.  Restarted networking and my new assigned ip address was done.

The default webserver install of debian also installs php5.  To that I added
  • php5-sqlite 
  • php5-imap 
  • sqlite 
  • gzip 
  • mc  (midnight commander)

As root, downloaded the latest oneye 0.9, moved it to /var/www/ and unzipped it.

# cd /var/www
# chmod -R 777 oneye/

on another computer, opened web browser  http://ipaddress/oneye

violas .....


There are an initial few questions, however they are pretty quickly sorted and the installation takes only a short time.  The only other thing you need to do is to edit the config file to make yourself the admin instead of root on the system.  Do this by going to:

# cd /var/www/oneye/
# vi settings.php
or whatever editor you like - I actually used mc for this

About 80% the way through the file is a comment that says

"// The real god of oneye users, the master of masters "
define('REAL_ROOTUSER','root');

change the "root" for whichever user you like.  Now when you set system preferences, you will get access to the Admin panel.


That's it.

Later 12 May ....

  • Installation of additional applications is dead simple.  Download the "eyepackage" to the admin desktop and click it - it installs.  Done.
  • Integration of FengOffice and SugarCRM is available, so instead of using "sqlite" as the database manager, it might be advisable to use "Mysql" in the initial install.
13 May

Something that shows my inexperience in servers.  It occurred to me this morning that the data from web users was being accumulated in /var rather than /home.  Obvious when you think about it, but when you are used to a desktop  system, all the users having their data in /home is ingrained.

So, need to download "PartedMagic" and "boot" from the iso to graphically resize the partitions of my virtual machine.  I could also use "parted" from the command line I guess and it would do me good to have a look at it.  In any case, another wrinkle in the saga and something else learned.

    Later....

    Saturday, February 4, 2012

    Debian - Netinstall + Window Manager

    v 0.4.7

    Subsequent to my last post about the Netinstall as a console system, I experimented with installing Xorg and a Window Manger.

    " aptitude install xserver-xorg wdm wmaker xterm "

    as I found when I did the initial install, xterm was not installed and this made it all very difficult.

    18 meg unpacked ... reboot and works like a charm.  Now, having given the example, you could insert gdm3 or slim instead of wdm and fluxbox or whatever instead of wmaker.  I simply did this as an experiment.

    Since we are talking about Window Maker as a manager, here is a description as to how to configure it ...

    http://maketecheasier.com/create-a-great-window-maker-desktop/2009/02/14


    Later .....

    Update Monday 6 Feb (just after shaking my head in wonder at how you get to the Superbowl, then get caught out putting 12 men on the field .....)

    I also installed Fluxbox and Fvwm.  Both seems to have improved default values these days - but I also installed Conky from the repositories.

    Netinstall + X + Window manager (Fvwm) + conky .... under 35 meg memory useage!  And this from a standard Debian install - just choosing what you run.

    Others (approx):
    • Fvwm   34 meg
    • Fluxbox  32 meg
    • Window Maker  28 meg
    • Openbox-Session 24 meg
    • Add 5 meg for each terminal
    By way of comparison, the Wheezy Xfce install I did previously uses just on 92mb.

      Later....

      CrunchBang

      v 0.2.7

      A couple of nights ago, I was sitting in the bar at my hotel in Melbourne whilst consuming my accumulated drink vouchers, when an elderly lady who had clearly been enjoying the hospitality of the establishment started randomly haranguing groups of patrons as to the greatness of John Oppenheimer.  This enjoyable "impromptu theatre" was terminated when she was quietly led away.

      What has this to do with the subject?  Everything.  Mr Oppenheimer was one of the major contributors to the ultimate "CrunchBang" at the aptly named "Trinity Site".  So CrunchBang stuck in my mind and the more I read about it, the more I liked it (the Linux Distro that is).

      This minimalist distro is built directly upon a Debian Squeeze Netinstall and uses the Openbox window manager.  The Debian Backports and a Crunchbang repository are also used.  It is installed using a modified Debian Installer script, and like Ubuntu and a few other distros, the sudo command is used for administrator privileges.  A "cb-welcome" bash script enables additional functionality to be installed, however I found it failed when the technique to detect an internet connection simply wouldn't work.  Iceweasel release (the latest) is included along with Flash.

      I installed it in Virtualbox just as described in a previous post, though with a smaller "disk" and less memory.

      This is definitely not a beginner-friendly distro.  Straight up, editing of the sources.list is needed to tailor it for closer Debian repositories, and commenting out the "check-internet-connection" line in the "/usr/bin/cb-welcome" script is needed.  Simple, but a show-stopper for many.

      HOWEVER

      I REALLY like Crunchbang.  Why?  Crunchbang is built the way I think many more distros should be built that expand or modify a parent distro (in this case Debian Stable).  It uses the parent distro as a base and modifies it with additional repositories and scripts.  At all times you can go back and use the documentation of the parent distro.  This is truly using the "standing on the shoulders of giants" technique and benefits both the user and the Distro maintainer by (in this case) using what Debian has provided and improving just what needs to be tidied up for what that person wants.  No re-invented wheels needed.


      Later .....

      Update:
      The initial install uses 70 meg memory at idle and just under 1.9 gig disk space.

      Update 11 Feb.
      I encourage you to visit the Crunchbang support forums.  There are some really good posts with some great advice for modifying systems (how to for Xfce for example) or setup Conky (which I've become somewhat enamoured with).
      In addition, Openbox has started to grow on me.  Combined with the Debian Menu system it is really quite slick.

      Thursday, January 26, 2012

      Debian Wheezy in VirtualBox - Part 6

      v 0.2

      I have to say that I'm really enjoying playing with Wheezy in Virtualbox.  It is letting me have a really good look at where things are going - although the downside is that it is too easy to just stop my work and have a bit more of a peek.  I'm no expert, however it is really interesting finding a problem and then seeing what information there is available to get around it.  It is made so much easier because I am starting with a solid base system that I'm not relying on that I can just incrementally improve.

      On to what I have been doing ..

      Documentation

      There really is an amazing amount of documentation and how-to information available for Debian, not only on the Internet at large but also on the Debian Website and within the installation itself.  One example is the "Debian Reference" we installed in my last post. 

      Another package to look at installing is the "menu-xdg" to compliment "menu", the Debian menu package.  I installed it thinking I would perhaps GET a Debian menu in Xfce, but not to be - I think I'll have to define a menu-hook for it and do it manually - but not right now.

      " dhelp " is a package worth installing.  Once it is on your system, open a terminal and type " dhelp" .. it compiles a list of HTML documentation on your system and presents it in the default Web browser.

      If you get really keen and open the file browser, look in " /usr/share/doc " .. a documentation package for almost every package you have installed .. even one that describes the Debian Menu system in detail.

      Open Synaptic and search on "documentation" ... extensive stuff in the Debian Repositories.

      Other places to find great stuff are The Linux Documentation Project , and the Rute User Tutorial , not forgetting the Linux Cookbook .  Of course, the Slackware Linux Book project is just wonderful, and I've really been impressed with the detail of the documentation at Gentoo Linux.

      I think that is enough for today.


      Later ...............

      Tuesday, January 24, 2012

      Debian Wheezy in VirtualBox - Part 4

      v0.2
      Xfce

      The first thing I'd like to cover is the customisations I did and why I did them.

      I didn't like the desktop icons.  They were just yuk.  I found it difficult to open them - perhaps their target "doubleclick" area was too small.  So:
      • Application Menu > Settings > Appearance > Icons > Gnome
      • Much better
      • ps .. subsequently I had problems with the doubleclick ... right click and .. "open" .
      Wallpaper - For the first time, I've found some really nice wallpaper in the default install.
      • Application Menu > Settings > Desktop
      • Choose your wallpaper
      Yup, that's it.  They are the only two things I changed.  And I love the desktop.

      I had a look at the Xfce website, and there are a couple of webpages that are REALLY interesting - additions to the basic install ......
      Synaptic is your friend.


      Other Stuff

      I was going to leave this for a bit and round it out, however since I have a Licence renewal Simulator in a couple of days, perhaps I should concentrate on that.  Although this is fun as a diversion.

      Looking at Xfce has made me keen to look more closely at the GnuStep Desktop, Lxde, Fvwm and a couple of others (including JWM and Fluxbox) to see just what we can do to make a nice easy desktop.  At the moment though, Xfce is just beautiful.


      Later ...............

      Debian Wheezy in VirtualBox - Part 3

      v0.2

      I finished the previous part having just booted into a nice shiny Gnome 3 desktop in Virtualbox.  It certainly was a change to what I was used to.

      Before I get started though, what the Guest Additions do for you are that they allow seamless mouse movement between Guest and Host, and the ability to re-size the Guest desktop.  Just drag and it all works.  Three other features I'll mention in passing here are the ability to mount a DVD drive or ISO image, the ability to use a USB memory stick (after you have introduced it to Virtualbox in the USB section) and the ability to set up a shared folder between the two operating systems.

      Gnome 3

      I have to say that my initial experience was somewhat jarring.  I sort-of worked out some of the functionality, however it still largely felt like a bad visit to cartoonland.  I think I shall have to let it sit for a while, see if I can find a straightforward set of documentation and then re-visit.

      Despite my reservations, I can perhaps see the point of the developers in that new users MAY find it a good experience, though I still wonder.

      Xfce

      Whilst I had used Xfce a little in the past, I was keen to see how it had developed in the latest incarnation. Those who are used to Debian being associated with "old" software have obviously never visited the "Testing" branch.

      I re-did the Netinstall and put Xfce as the desktop of choice so as to see what came with it.  I found the log-in screen a little different to what I was used to (I use gdm and I assume this was different) however it went fine.  I don't care for the Debian starry wallpaper and need to do some reading to see how to replace it for the bootup and login.  The Xfce desktop came up very nicely and I had a great feeling about it right away - I can understand Linus's comments now about abandoning Gnome for Xfce.  I checked the "About" menu option and found it was Xfce 4.8, the latest version.

      About now would be a good time for a screenshot, but I won't.  Instead I shall use the wonder of text to describe it (you'll thank me for not exposing you to the starry paper background).

      Debian has Xfce set up with three bands by default.
      • Of course there is the desktop in the centre which has three icons at the top left for "Home", "Filesystem" and "Trash".  Right click the mouse and a menu allowing you to create desktop icons or select properties or applications, appears.  
      • Along the top is a panel reminiscent of the Gnome 2 setup.  On the left is a main dropdown menu of applications, then a shutdown button next to it.  On the right at the top are the icons for the default 4 workspaces, the time and the network status.
      • At the bottom is a panel in the centre that works a little like the OSX "Dock".  There are six icons by default.  Minimise Windows, Terminal, File Manager, Web Browser, Find Applications, and an icon that allows you to open any folder in your home folder in either the file manager or terminal.
      It is rather pointless talking about standard applications that come with Debian because it is easy to simply use the package manager and install those you like and eliminate those you don't.  I will say though that those that stood out to me were Iceweasel v9.0 (ie the running latest release of firefox) and LibreOffice.  I also like the lack of some of the major applications that come with Gnome by default that I just don't use.

      So in contrast with my initial impression of the latest Gnome, I rather like Xfce.  I'll leave this post here (and get back to what I should be doing) and next time I'll talk about some initial customisations I have done to make things just that bit better.


      Later ..............

      Monday, January 23, 2012

      Debian Wheezy in VirtualBox - Part 2

      v 0.2

      In Part 1 of this post, I talked generally about the requirements for setting up a Wheezy Gnome VM in Virtualbox.  I shall assume that you have the Machine specified, but not installed yet.  I shall also be rash and write these notes from memory.

      Installation
      • Start the VM.  If you are using a Windows host, it will politely ask you to tell it where the installation iso is, otherwise, you will need to let it fail, then use the "Device" menu at the top to select the CD netinstall iso image and restart.
      • The standard Debian installer screen is your first port of call.  If you want a Gnome desktop, just continue.  I never bother with the graphical install since it is just a more complex version of the standard text interface.  But then, I like the Slackware installer as well ......
      • To install a desktop OTHER than Gnome, go to "Advanced" and you will find links to a number of alternatives including KDE, Xfce and Lxde.
      • Now you need to simply proceed through the standard Debian installation routine for what you want.  There is an EXCELLENT Debian installation guide at "Howtoforge" entitled "The Perfect Desktop Debian Squeeze" which I strongly recommend.
      Installing Guest Additions

      If you are using the Gnome 3 desktop,  the initial log-in will be slow while it works out that it cannot use the standard Gnome and will fall back to the "classic" look (which you could also select on log-in the first time).  The steps I followed to get the guest additions installed and Gnome 3 running (I also described the guest additions with Debian in another post - read it and you can tell me where I differ to it):
      • Open a "root" terminal.  I'll describe the commands to type in between the "  " ....
      • "  aptitude install synaptic "   Synaptic is a nice graphical package manager that has its uses.
      • "  aptitude install module-assistant  "   Module assistant is the key to installing guest additions
      • "  m-a prepare "     This gets module assistant to load the dependencies for the guest additions
      • Start Synaptic, search (there is a magnifying glass button for search) for " virtualbox " and mark any installed virtualbox package for removal (they will be marked as guest additions), then " Apply "
      • The tricky bit is coming up
      • You need to mount the "guest additions iso" which is located in the installation directory for virtualbox.  You can either select "install guest additions" from the "device" menu on the VM or you can use the " device " menu and CD/DVD selection to search for the guest additions iso.  In either case, you should make sure it is mounted.  It will appear mounted under " /media/cdrom0 "
      • Once you have it mounted, use the root terminal to "  cd /media/cdrom0 " and to execute the "VBoxLinuxAdditions.run"  as shown in the next part
      • "  bash ./VBoxLinuxAdditions.run "   using the root terminal after changing to the iso.   You need to have the "  ./  " in front of the Vbox..etc because it explicitly tells Linux where the file is.  (ie a period and forward slash).
      • At some stage, it will complain that there are already Guest Additions installed - ignore it because you just deleted them and it has detected the remnants.
      • Once this is completed, reboot the VM and you will now have an accelerated Gnome 3 desktop.
      That's it for the moment.

      As always, corrections or additions welcome.


      Later ................

      Debian Wheezy in VirtualBox - Part 1

      v 0.2

       This post has grown significantly since I started, so I've had to split it up ...... here goes ..

      I'm a fan of Debian Linux.  Whilst Ubuntu is fine, Debian just sits right with me.  Same with Virtualbox.  I have had a Debian Squeeze virtual machine on my laptop and desktop for some time and thought I'd explore a bit further. 

      One thing I did recently was to explore the concept of using a Debian VM as an encrypted volume.  Whilst there are some other means of encrypting files and partitions, I've found it is quite effective to install a Debian encrypted VM and use that.  It is quite straight-forward, as I described in an earlier post installing to an old laptop. Free and neat.

      What I have been thinking of recently, though, is exploring Wheezy (Debian Testing) and the new Gnome.  I'd been hearing a few things about it that disturbed me, and I have been eager to explore a bit, since I have shown a few people Debian recently, and they love it.  Gnome in Squeeze is quite easy for them and I've been wondering how they would fare.


      Wheezy Netinstall

      First, how do you find an ISO to install?  Easy - search on "debian installer" and it will take you to the page from which to download a "netinstall" image.

      http://cdimage.debian.org/cdimage/daily-builds/daily/arch-latest/i386/iso-cd/

      You can see from this that this is the link to the "i386" image.

      http://cdimage.debian.org/cdimage/daily-builds/daily/arch-latest/i386/iso-cd/debian-testing-i386-netinst.iso

      Now, what is a "Netinstall" iso image?  It is a Debian Installer cd image that will install a base Linux system onto your computer from which it then connects to a Debian Repository to download the remaining files to produce a complete system.  Note, you need to be connected to the Internet when you use the Netinstall image - I guess that is .. er .. why it is called "Netinstall".

      Virtualbox

      Given that Virtualbox is free and available for all common platforms, I've found it most useful.  I can run a copy of the same Linux VM on both my Windows desktop and my Mac Laptop. 

      For those who don't know, Virtualbox started as a private, open-source project many years ago before being bought by Sun, who continued developing it, before in turn being bought by Oracle who have thankfully kept the project going.  The latest can be downloaded from http://virtualbox.org  .  You will need both the version for your platform, and the guest additions (which install into virtualbox easily).

      Preparing Virtualbox for Gnome 3

      I have two Wheezy VMs - one for Gnome and one for Xfce desktops, to see what is available and how best to tailor Wheezy for what I want, however I used the same recipie for both VMs.  It is pretty straight forward to prepare a VM in Virtualbox, and you can always read the documentation or Google for some pointers, so I'll only cover the particulars of my install.
      • I started the new Gnome VM by calling it WheezyGnome - Virtualbox immediately figured it was going to be a Linux VM.  
      • I created an expanding volume, max 15 gig
      • In the Display section, I gave it 128 meg of video memory and ticked the 3d acceleration
      Gnome 3 needs 3d acceleration to give you the best "experience" otherwise it starts in a fall-back mode.  When you first install any Linux distro with Gnome 3, you will need to start the fall-back mode until you have installed the "Guest Additions" to the VM.

      Next ...

      Next I'll talk about how I got Gnome 3 up and running in Wheezy ...


      Later .....

      Friday, June 17, 2011

      Debian Squeeze - VirtualBox Guest Additions

      v 0.3

      This post has a number of connections - it ties together a number of the posts I've made today and also my post on Bitcoin mining.  As I posted there, you can let the mining happen in a Windows environment and run a normal desktop, say Slackware or Debian under Virtualbox.  I noted that playing video clashes with Bitcoin mining, but not if you run it in a Virtual Machine.

      Slackware already comes with all the required build tools to install Guest Additions and all it requires for that is to mount the Guest Additions ISO and run the script.  Debian needs a bit more.  You need to ensure the kernel headers and the build tools are installed - either by installing Module assistant and then using the command " m-a prepare " or downloading the headers and build tools as described in the previous NVidia driver post.  If you find you need an alternative compiler version, the refer to the post on that.

      Finally, just mount the Guest Editions ISO (in its most basic form you can find it in the Virtualbox directory) and then run the appropriate install script on that ISO.  Very simple.


      Later.....

      Jan 2012

      Upon re-reading this, it seems a little spartan - I've detailed the process a little better in my post today on installing Debian Wheezy in Virtualbox...

      Rgds

      Debian Squeeze - Module Assistant

      v 0.2

      Often, in Debian, when you install a module from source, install proprietary Video Drivers (I'm looking at you Nvidia), or the Guest Additions in VirtualBox, you need some or all of the current Kernel Headers, the appropriate Compiler and the appropriate source code.  Module assistant can make it easy for you to do some or all of those things.  For example you can use it to download and prepare the kernel headers and make sure the build tools are available before you manually run another script, or you can use Module Assistant to prepare all available modules for you to choose which one to compile and install.  The Debian Wiki has an excellent run-down on using Module Assistant both in command line and interactive mode.  It also has a complete listing of available modules for the Debian kernel.

      http://wiki.debian.org/ModuleAssistant

      Each of the tasks I mentioned above is deserving of its own post, even if it is short so as to make it all easier to find, however they are all interwoven.  An additional post I'll make is how to change the default gcc compiler version, since sometimes this is needed - as it was with the installation of the Lenny NVidia drivers.


      Later ...........

      Saturday, June 4, 2011

      Bitcoin - Solo Mining - Windows 7 - ATI HD 6970

      v 0.7
      Before you do anything with Bitcoin, you need to be running the Bitcoin software.  Of course, you will have visited the Bitcoin website and read everything there.  The software is on the front page of the website.

      Bitcoin Website.

      I ran the software for a couple of days before I realised that I was only using the Intel processor, not my video card's GPU to generate bitcoins.  Some research and I downloaded Guiminer and tried that, however whilst this provided part of the puzzle, it failed to get things working and I ended up doing the gruntwork with the command line "poclbm".  Of course, since the command line programs are supplied with Guiminer, then no extra download for that is needed.

      The final piece of the puzzle is getting "OpenCL" working.  Guiminer does NOT recognise the latest AMD incarnation, only the previous one.  I ended up installing both, so had to choose when I started the command line up, as you will see when I get to the startup command line instructions.

      Software
      Guiminer
      https://github.com/Kiv/poclbm
      Download button on the upper right lets you download the latest .. here is a direct link to the latest at time of writing:  https://github.com/downloads/Kiv/poclbm/guiminer-20110521.exe

      Stream opencl
      http://developer.amd.com/Downloads/ati-stream-sdk-v2.3-vista-win7-32.exe
      http://developer.amd.com/Downloads/ati-stream-sdk-v2.3-vista-win7-64.exe
      http://developer.amd.com/Downloads/ati-stream-sdk-v2.3-xp32.exe
      http://developer.amd.com/Downloads/ati-stream-sdk-v2.3-xp64.exe

      or

      AMD SDK
      amd-app-sdk-v2.4-windows-64.exe    from
      http://developer.amd.com/sdks/amdappsdk/downloads/pages/default.aspx


      Here is a guide for guiminer which helped me to get started, however I had to work out the end details:  http://forum.bitcoin.org/index.php?topic=10438

      Procedure

      Install and run Bitcoin.  For mining with your GPU, you will need to run bitcoin as a server, but for the moment, we can look at the interface.  There is your bitcoin wallet address, and on the bottom right, your connection status and downloaded blocks.  If you want to generate coins with your CPU, then click "settings" and "generate coins".  Don't expect much.

      Make sure you have un-installed any conflicting video drivers and installed the latest ATI drivers for the 6970.  I also ran a registry cleaner to make sure there were no confusing pointers, then rebooted.

      If I had to do it over again, I would only load the "ati-stream-sdk-v2.3".  Guiminer recognises it and it saves an extra flag in the command line.  Reboot.

      Install and run "guiminer".  Have it in a convenient directory that is easy to refer to on the command line.  We will be using the "poclbm" program it comes with later.  What you get out of running the command line is that you can set up the configuration files.  IF you have installed the stream sdk properly, then everything will work when it starts up and you will see it has found your video card in the "Device" drop down, otherwise it will complain that it can't find an "opencl" device.
      • Select "solo" miner.
      • Under solo utilities, enter the username and password you wish to use to log into the bitcoin server.
      • Enter any extra flags you want to use for the device (see the hardware comparison from the previous post).
      • Save the configuration.
      There are two configuration files:

      First
      \User\AppData\Roaming\bitcoin\bitcoin.conf
      Within that file, should be two lines set from guiminer.
              rpcuser=username
              rpcpassword=password

      Next
      \User\\AppData\Roaming\poclbm\poclbm.ini
      Inside this is the solo miner configuration.

      {
          "profiles": [
              {
                  "username": "user",
                  "balance_auth_token": "",
                  "name": "Default",
                  "hostname": "localhost",
                  "external_path": "",
                  "flags": "-f60 -v -w128",
                  "autostart": false,
                  "device": 0,
                  "password": "password",
                  "port": "8332"
              },
          ],
          "bitcoin_executable": "C:\\Program Files (x86)\\Bitcoin\\bitcoin.exe",
          "show_opencl_warning": true,
          "show_summary": true,
          "show_console": false
      }

      The Command Line

      Open the command line.

             start /D"C:\Program Files (x86)\Bitcoin" bitcoin.exe -server

      This line starts the bitcoin program as a server.  The bitcoin window will open as a separate process. The directory switch means you can run the command from anywhere.
      Wait till a connection has been made.

      start /DC:\pro\guiminer poclbm.exe --platform=1 --device=0 --user=username --pass=password

      Enter the above command line (altered for your machine of course).  Note the directory switch nominates the directory - there is a space between the directory and the program executable name.  Also note the --platform switch.  I use 1 because I have two possible libraries as I have both the AMD and the ATI Stream libraries loaded - ATI Stream is the second one (1) that the system recognised first, so I'm staying with that.  I follow it with the device switch which is the video card, and then the username and password that you set in the configuration file.

      It took me a while to get it sorted, but then my Video card sprang to life and the fan went wild and you could almost feel the load.  Instead of 3 M/hash per second, I was getting 350 M/hash per second.

      Best of luck and I hope it works as advertised.


      Later ...

      Update:
      I included a flag "-f60" in the poclbm.ini file.  I found without that flag, the default of "-f30" made the priority of the poclbm process too high.  I would find that after an hour or so, with the computer churning away, if I came back and wanted to do some work on the machine, it would apparently "lock" up on me and I'd have to reboot.

      Update 2:
      The "-f60" flag has definitely improved stability with no noticeable loss of processing.  The only problems I've had is when trying to play a Youtube video, when the system locks up.

      Update 3:
      The lock-up remains no matter what "f" flag I use.  It would appear that Flash video and bitcoin mining are mutually exclusive.

      Update 4:
      The solution I use (for the machine lockup with video playback) is to use a virtual machine for much of my work.  I have Debian 64 set up as a virtual machine using Virtualbox, and I also have instructions for a Slackware VM elsewhere in this blog.  Video playback works fine in the VM and it all works seemlessly.  My normal use of the machine barely touches its capabilities and I can run the mining on Windows.

      Update 5:
      Yesterday I found I had "rcp connection problems".  Solutions presented on the net didn't work for me.  Then I had a look at the bitcoin version I had (21) .... I updated to the latest (23) and the problems went away.  I also discovered that once you start the bitcoin server, you can then start the poclbm miner.  It will complain about no connection etc but as soon as there is one it starts churning away.

      Update 6:
      There was an update to my Catalyst Control Center from AMD tonight.  It broke the miner I had sorted.  That's the bad news - it gets better from here.  In the article above, I talk of downloading the ATI stream SDK 2.3 ... well, that is broke and we must move on.  Install the AMD 2.4 SDK and all will be fine.  In my setup, I had both - the 2.4 was platform 0 and the 2.3 was platform 1 (as reported to me).  I simply changed the "platform=1" switch to "platform=0" and all was again well.