Sunday, May 20, 2012

Citadel Groupware

 v 0.22
24 May 12

Citadel is different - on first glance, it looks like a BBS with aspirations above its station.  I’ve had a love/hate relationship with this Groupware from the first time I saw it in the Debian repository and read about it.  

It has history … extensive history.  It grew out of the old BBS systems of Dial-up modem times, and still has a text mode that replicates that, although normal interaction is through a web browser and the “Webcit” server application.

Citadel looks, at first, a little dated and I’ve found user documentation a little sparse, however I’m slowly “getting” it and starting to really like it.  One thing I especially like is that it has several security advantages over other packages, notably immunity to PHP and SQL attacks.  It has its own inbuilt servers and it does not use PHP or MySQL.

So, how does Citadel qualify for the compliments I’ve seen about it?

Whilst it may seem a little “clunky” at first glance (it can be modified), its power lies in its simplicity of concept and gentle learning curve.  It is easy to set up, and you can start out with a very simple configuration and expand as you become familiar with how to use it.  It is like being given a pile of different lego blocks and discovering how to assemble them into ever more complex objects.

It is probably time for a screenshot (from the Citadel website), and then a discussion of how the setup works.  Once logged in to the application, this is how it generally looks, with a menu on the left and the subject of whatever you have selected in the main window.  Note:
  • login and viewing details in the top right
  • selection options for the current viewing window along the top menu-bar
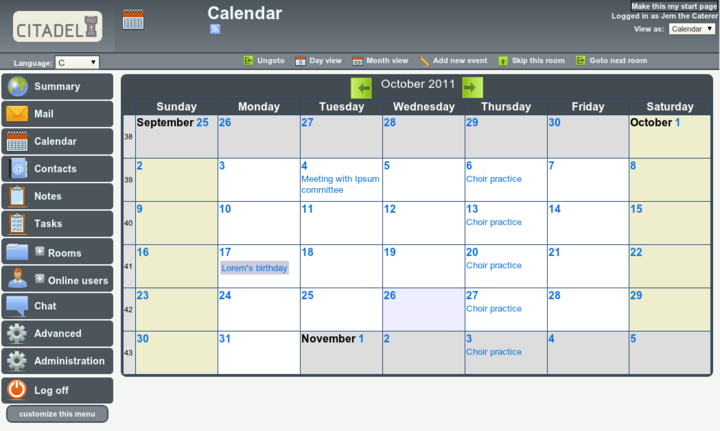


Of the “Menu Selection Buttons” on the left, the private “rooms” for each user are:
  • Mail
  • Calendar
  • Contacts
  • Notes
  • Tasks
 

  • The “ +Rooms “ selection expands to the current “room” matrix.  These can be public or private, hidden or password protected, as determined when they are created.
  • “Advanced” is allocated on a per-user basis, depending on what permissions a user gets.
  • “Administration” is, obviously, allocated to an Administrator.
  • The menu is tailored to each user and setup.

At its core, Citadel is an old-style BBS.  Forums use the paradigm of “Floors and Rooms” of a building.  Each “Floor” has a broad subject, with each room being a more specific subject.  Where this differs from a standard BBS is that each room can take several forms.  The “room” could be a standard message topic discussion, or it could be a task list or a Blog.  So, in the case of a company project, there could be one floor named “Project” with separate rooms for message discussions, task lists, a blog talking of progress on issues and even perhaps a calendar.

Communication.  
  • Out of the box, Citadel offers email between registered users, with only the username required.  After it is configured, then conventional email is available.
  • There is an IM facility between logged in members.  There is more. Put a “Jabber” client such as Pidgin on your desktop and tell it about Citadel, and Citadel can act as a Jabber server connecting users.

Office Documents
  • Blog and Wikis.  Any room can be configured to act as it says.  I have to say though that I’ve yet to get the Wiki feature to work as I’d like (upgrade to 8.11 fixed that problem).
  • Calendars and Notes and Tasklists.  As it says, you can also nominate any room for these.  The “Notes” are sticky notes, and the Tasklists, while basic, can be categorised quite finely.

Networking
  • Citadel servers can be configured to network together simply by telling them about each other.  Users, rooms etc can be shared and a quite complex “social network” of sorts can be constructed.  These building blocks can link together to construct quite a complex system.  Impressive.

One final thing for the moment.  FLOSS Weekly Episode 209 is all about Citadel.  Worth the look.


Later...

Thursday, May 17, 2012

Debian - Package Management Atrocities

v 0.2
17th May 12

Flush with my success at installing "onEye" and a LAMP capability to my Wheezy server, I thought I'd have a look at the Citadel Groupware, provided in the "Main" Wheezy repository.  All went well, and I answered the configuration questions to the best of my ability.  I elected to use Apache as the web server rather than the internal one provided.  Unfortunately, I couldn't find how to run Citadel in the web mode (it ran fine in BBS command line mode).  It eventually turned out that the Webcit web client listens on port 8504 (from memory).  In any event, think carefully how you are going to use Citadel in concert with other web applications.

I decided to reconfigure the application and ran:
# dpkg-reconfigure citadel-suite

this did nothing and before I found out what I SHOULD have done, I ended up deleting some of the configuration files after mistakenly thinking I'd purged the whole thing.

What I SHOULD have done was:
# dpkg-reconfigure citadel-server citadel-webcit

Seems if I'd re-configured these packages that are called by the meta-package, all would have been well.  Lesson here.

note:  There may be some minor errors above as I've written it from memory, however the overall lesson remains.  look at re-configuring the correct packages ......


later ...

Saturday, May 12, 2012

OnEye - Installing to Debian Wheezy on Virtualbox

v 0.35
13 May 12

Last post I said I had OnEye successfully installed.  Here is how I did it.

Initially when I thought of setting up a server, I thought of buying a low power piece of hardware and using that, but then realised I already had an under-utilised desktop that could easily run a server in the background using virtualisation - an opportunity to try out and learn a few skills in the process.

After updating Virtualbox to the latest version, I created a new virtual machine.  I've learnt a bit about setting the boot device since my last installation and so with the new virtual machine entry highlighted in the VirtualBox window, press the "Settings" button.  Press "Storage" and then click the CD icon under "IDE Controller", then on the right where it says cd/dvd drive, click the icon of the cd and from the dialog box, move to and select the iso image you want to boot from.  Now when you press "Start" it will boot from your downloaded ISO - in my case, the Debian Testing Netinstall ISO -

http://cdimage.debian.org/cdimage/daily-builds/daily/arch-latest/i386/iso-cd/debian-testing-i386-netinst.iso  .


Once I started the install, it came up with the standard debian install dialog - as contained in a number of Debian installation how-tos. The text installer is readable and when you think about the selections, they are logical.

  • English language
  • Where you are in the world (Australia for me)
  • American English keyboard

I chose the guided partitioning with separate partitions and accepted the defaults - I'd created an expandable 250 GB virtual machine so this is what the Debian Installer gave me:

/ 350mb
/usr  9 GB
/var  3 GB
/swap 2.1 GB
/tmp  398 mb
/home 233.5 GB

When Tasksel presented itself, I deselected the desktop and selected
  • Web server
  • SSH server 
  • Standard System Utilities

Later, just to be sure I also installed the apache2 package and restarted apache2.  I installed links2 and was able to confirm the webserver was functioning in both root and user accounts with

$ links2 http://localhost/index.html  and
$ links2 http://localipaddress/index.html

Unfortunately, I was unable to see the page on any other machine on the network.  A read of the Virtualbox documentation.  I was using NAT which was fine for general web browsing etc, however for using a server, I needed a Bridged adapter.  I shut down the server, changed the network adapter to "bridged" and restarted.  Fixed.

On an external computer, simply type the local ip address into the web-browser and it will be found - so that worked.

Next task was to assign a permanent ip address from my router.  Logged into it and assigned a local ip address based on the MAC address shown with "ifconfig" in the Virtual Machine.  Restarted networking and my new assigned ip address was done.

The default webserver install of debian also installs php5.  To that I added
  • php5-sqlite 
  • php5-imap 
  • sqlite 
  • gzip 
  • mc  (midnight commander)

As root, downloaded the latest oneye 0.9, moved it to /var/www/ and unzipped it.

# cd /var/www
# chmod -R 777 oneye/

on another computer, opened web browser  http://ipaddress/oneye

violas .....


There are an initial few questions, however they are pretty quickly sorted and the installation takes only a short time.  The only other thing you need to do is to edit the config file to make yourself the admin instead of root on the system.  Do this by going to:

# cd /var/www/oneye/
# vi settings.php
or whatever editor you like - I actually used mc for this

About 80% the way through the file is a comment that says

"// The real god of oneye users, the master of masters "
define('REAL_ROOTUSER','root');

change the "root" for whichever user you like.  Now when you set system preferences, you will get access to the Admin panel.


That's it.

Later 12 May ....

  • Installation of additional applications is dead simple.  Download the "eyepackage" to the admin desktop and click it - it installs.  Done.
  • Integration of FengOffice and SugarCRM is available, so instead of using "sqlite" as the database manager, it might be advisable to use "Mysql" in the initial install.
13 May

Something that shows my inexperience in servers.  It occurred to me this morning that the data from web users was being accumulated in /var rather than /home.  Obvious when you think about it, but when you are used to a desktop  system, all the users having their data in /home is ingrained.

So, need to download "PartedMagic" and "boot" from the iso to graphically resize the partitions of my virtual machine.  I could also use "parted" from the command line I guess and it would do me good to have a look at it.  In any case, another wrinkle in the saga and something else learned.

    Later....

    Friday, May 11, 2012

    EyeOS v OnEye - Your Computing Desktop in the Cloud

    v 0.2
    11 May 12

    For those who like looking at the last page .. I now have a onEye setup working on my home network.  It was easy to set up (using a Debian Apache webserver in Virtualbox) and is pretty neat.

    Now to what I was about to talk about.

    A couple of weeks ago, I was watching an episode of "The Linux Action Show" where they were talking about personal alternatives to cloud computing services.  One of these was the EyeOS product.  I was interested and had a look.  Whilst I really wanted to like this, I had the impression that the people there had moved solidly towards their "Professional" product (good on them) and their "2.5" release was just missing things that I would have liked.  I couldn't quite put my finger on it, but the feeling was there.

    A bit more research and I was starting to get a feeling for what was going on.  It seems that the EyeOS has forked at the 1.9 branch as a community project, renamed "onEye" and that many people prefer this branch to what has been produced to the 2.x series.  I have the feeling that the 2.x series would appeal to businesses, whereas the 1.9 series is more for the community.  The thing that really got me interested in looking at onEye rather than EyeOS was an evaluation which suggested that installation was less than ideal in the EyeOS implementation, and that the 2.x series was incompatible to many add-on applications that had been developed.

    So what is it about all this that you should be interested about?  Effectively, when you log on to onEye / EyeOS, you are logging on to a computer desktop in the cloud.  Think Dropbox with a desktop and applications.  They have a sync applicaton along with some standard apps that are supplemented by a whole swag of others.  There is even a web browser in the standard setup.  Now why would you want a web browser within a web browser?  Well for a start, all browsing traces are left in the cloud.

    Whilst reaction time for this desktop over the Internet is entirely dependent upon your connection speed, on a home network it is quite snappy and could be really useful for organising the sometimes chaotic things that happen on different computers at home - particularly in centralising backups of files we don't want to use.  (of course .. ownCloud is a contender for that as well).


    Later ....